- Published on
Postman API platform – Part 1: The basics
- Authors

- Name
- Aleksandar Zeljković
- @a_zeljkovic
From a side project for API testing to an API platform used by more than 17 million developers, Postman has come a long way. Today, Postman is much more than a simple Rest API client, with a huge community, excellent support, and a variety of features for the development and testing of web APIs. Nevertheless, a lot of engineers are not utilizing the full potential of Postman due to a lack of knowledge and tremendous evolution of the tool during the past couple of years. In this series of articles, I’ll try to expand the knowledge and maximize the value which Postman can bring to your daily work.
Installation and setup
Postman is available as a native application for Linux, Mac, and Windows. It can be downloaded and installed from https://www.postman.com/downloads/. Postman can also be used directly from the browser: https://web.postman.co/. Be aware that usage of Postman from the browser requires installation of the desktop agent in order to overcome browser CORS limitations. Also, if you want to use the browser version, you will have to say goodbye to the “find and replace” feature, certificates and proxy manipulation as well as the Postman interceptor. I personally have never found the use case for Postman from the browser, but it’s good to be aware of it in case you find it useful. Another useful step in Postman setup would be the creation of the (free) user account. There are two main benefits of a Postman account:
- ability to sync all your postman data across multiple devices
- API services and integrations:
- 1000 API mock server calls (monthly)
- 1000 API monitoring calls (monthly)
- 1000 calls to Postman API (monthly)
- 5 integrations
Firing the first request
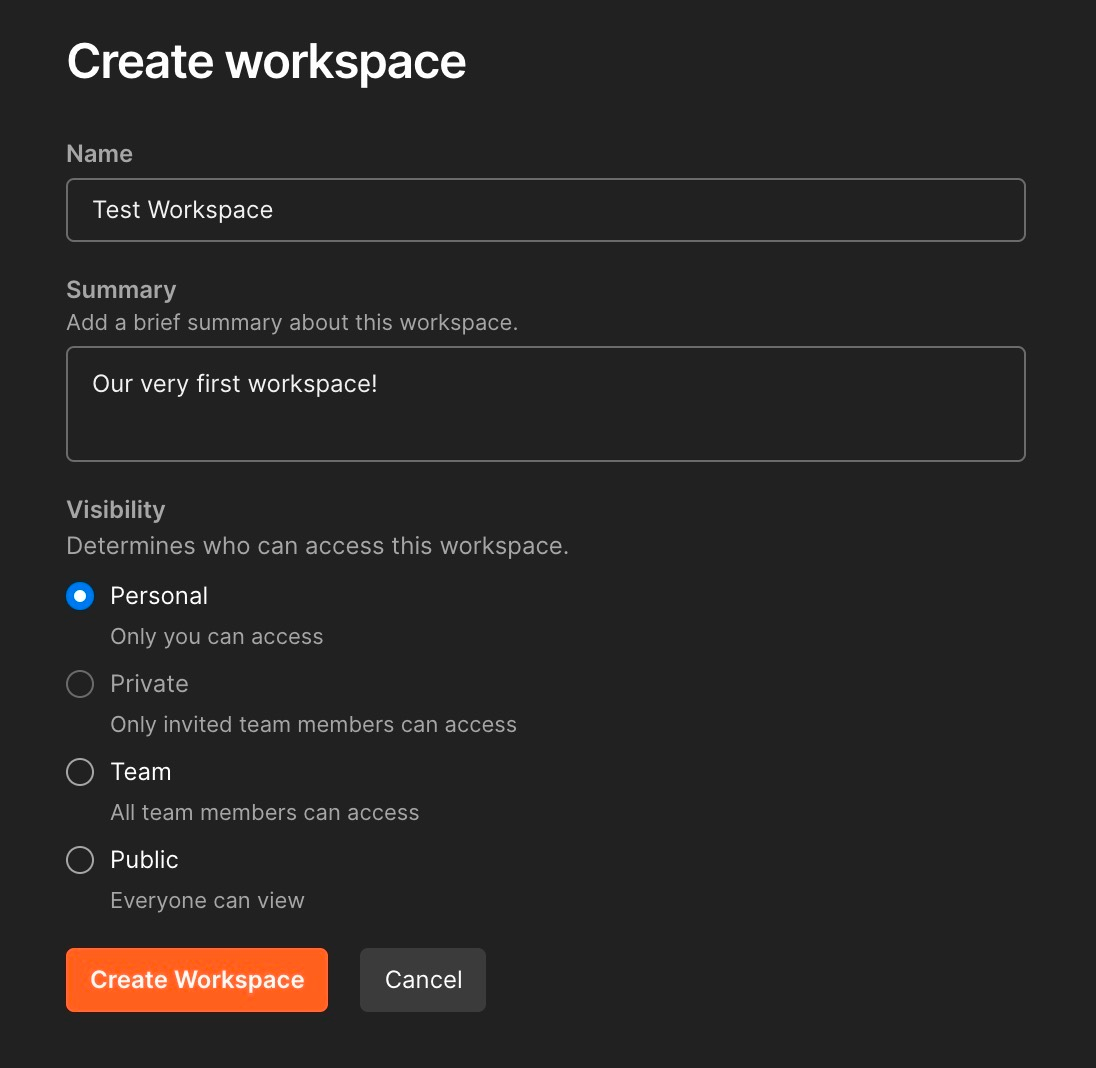
Before we launch our first API call, let’s clarify two fundamental organizational terms in Postman: workspace and collection. Workspace is a logical area that separates different projects for the same user, as well as artifacts related to that project: requests, collections, APIs, (local) variables, etc. Within the workspace, we can create a collection, a set of related requests grouped together. We can understand the workspace as a project, and collections as folders for requests. Now let’s create our very first workspace by clicking on Workspaces -> Create Workspace.
Afterward, we can create a collection for our requests by clicking on Create collection button on the left side of the screen. Once this is done, let’s click Add a request to create our very first request. The request tab has six primary elements:
- request name
- HTTP verb
- request URL
- send button
- request information area
- response information area
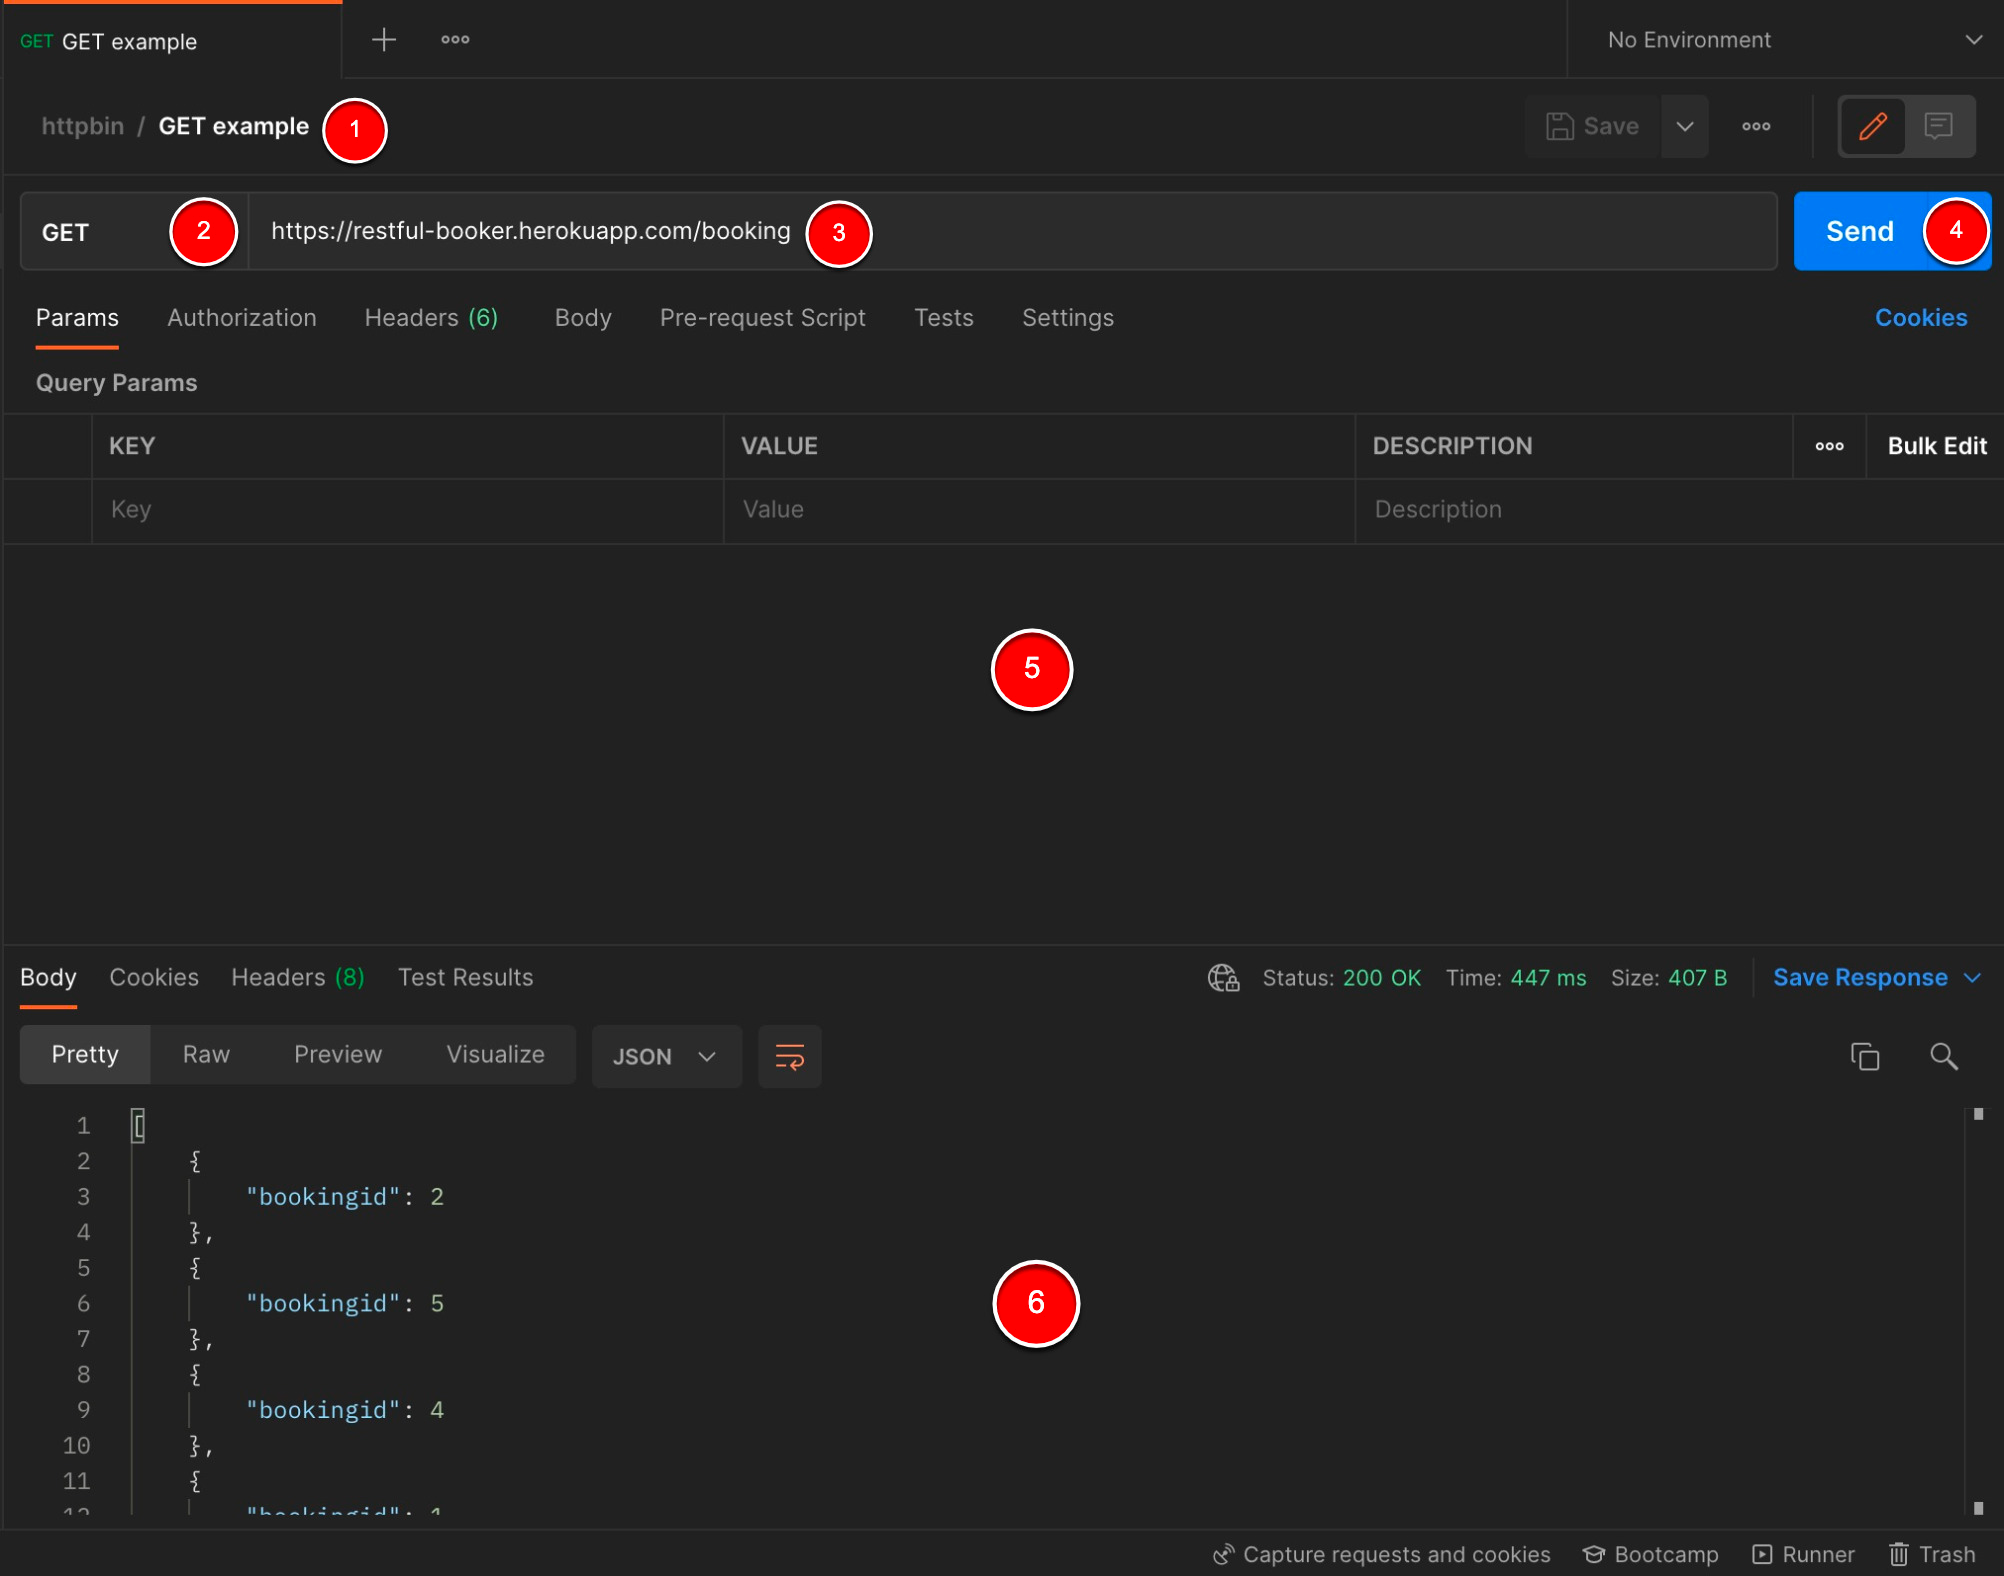
Now, let’s leave the default GET method and set the following URL: https://restful-booker.herokuapp.com/booking. After we hit the Send button, we can see a Sending request message in the lower section of the tab, and after a few seconds, voila, our first request is made!
Info: Examples in this article are using Restful-booker API, created by Mark Winteringham. More info and API documentation can be found at https://restful-booker.herokuapp.com/
Request and response anatomy
Besides HTTP verb and URL, the request section has the following elements:
- Params – key-value pairs of query parameters. If these params are already set via URL, they will be automatically shown in this tab as well.
- Authorization – authorization methods for the given request. All major authentication protocols are supported (API keys, bearer, OAuth, etc…).
- Headers – list of request headers. Besides custom headers that can be added, Postman is automatically setting necessary headers as well.
- Body – request body can be sent in the following forms:
- none
- form-data
- x-www-form-urlencoded
- raw
- binary
- GraphQL
- Pre-request scripts & Tests – this will be discussed in detail in the next article
- Settings – fine-grained request properties related to redirects, certificate verification, etc.
- Cookies – user can either set cookies or check the ones that are automatically set
The API response area contains:
- Body – response body data that can be formatted depending on the response type
- Cookies
- Headers – response headers
- Test results – this will be discussed in detail in the next article as well
On the right side of the response bar, the user can see the following response metadata:
- network details – on hover, server IP address, TLS protocol details and certificate details can be seen
- response status code – on hover, description of status code is shown
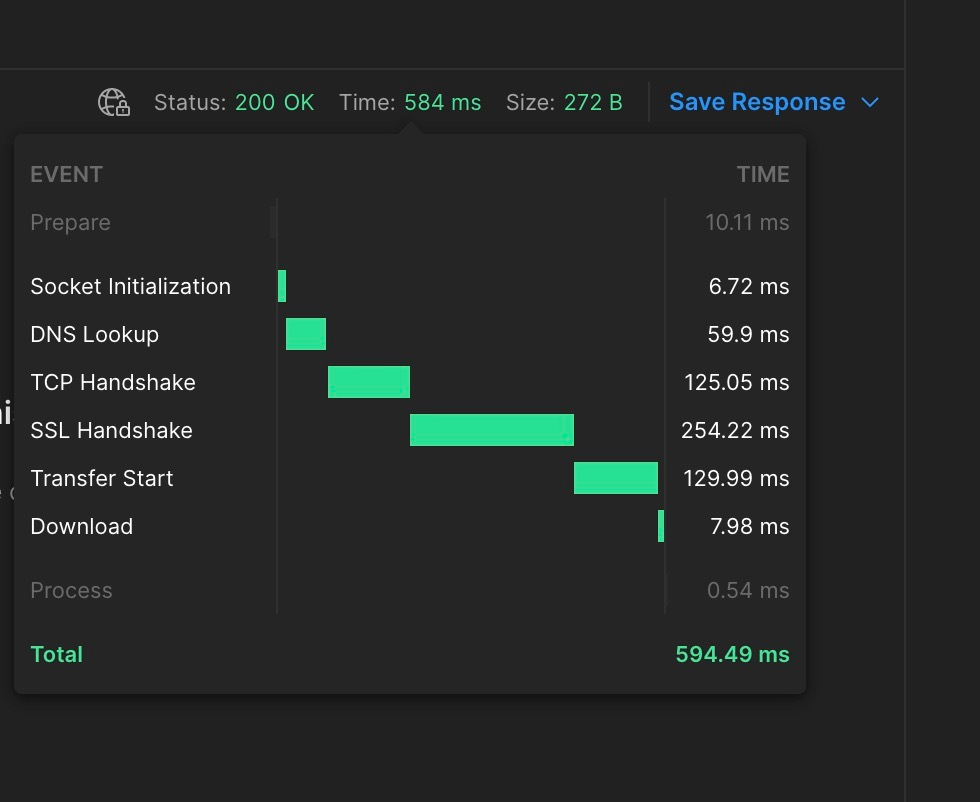
- request time – total request time. On hover, the timeline breakdown can be analyzed.
- size – response size. On hover, detailed information about both request and response size can be seen.
- save response – response can be exported to a file or saved within Postman
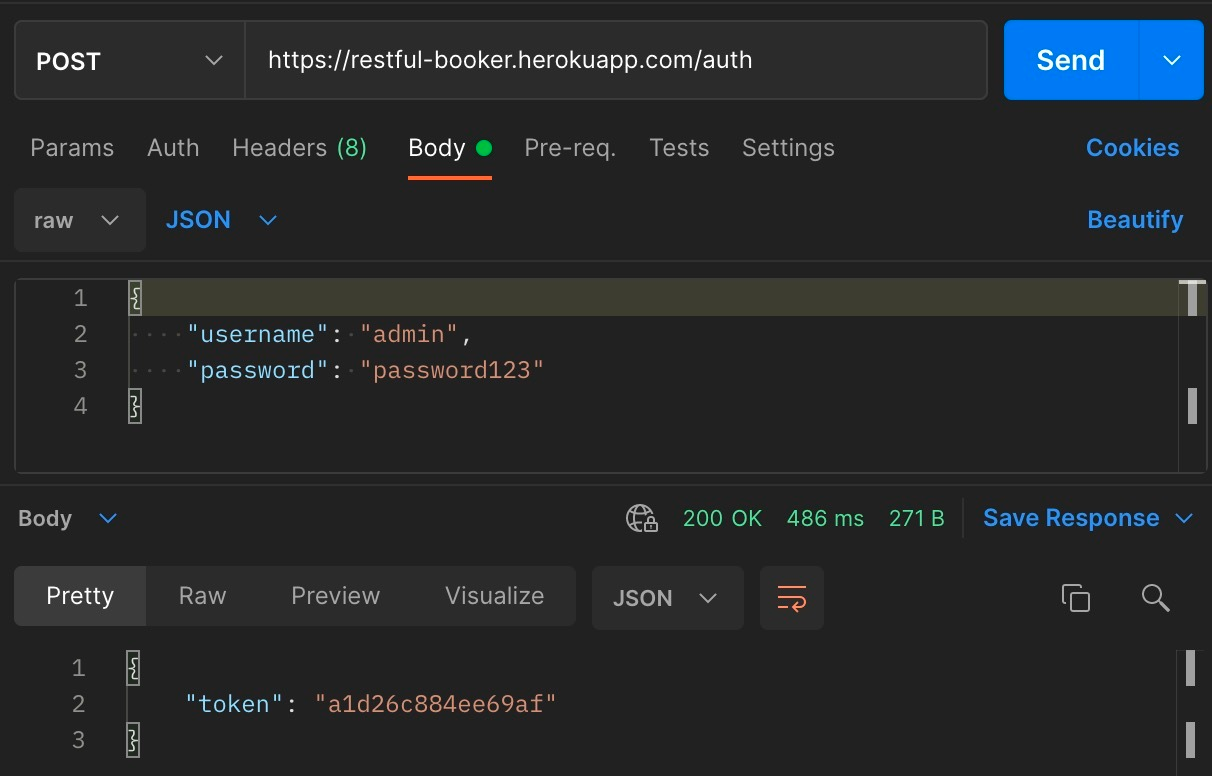
Let’s make a couple more requests to put this into practice. First, we are going to get an authentication token for subsequent requests. We are making a POST request, to https://restful-booker.herokuapp.com/auth, with the following request body:
{
  "username": "admin",
  "password": "password123"
}
If everything is done correctly, we should receive status code 200, and JSON with the authentication token:
Since we have an authentication token, let’s delete a couple of bookings. First, let’s try to delete without authentication:
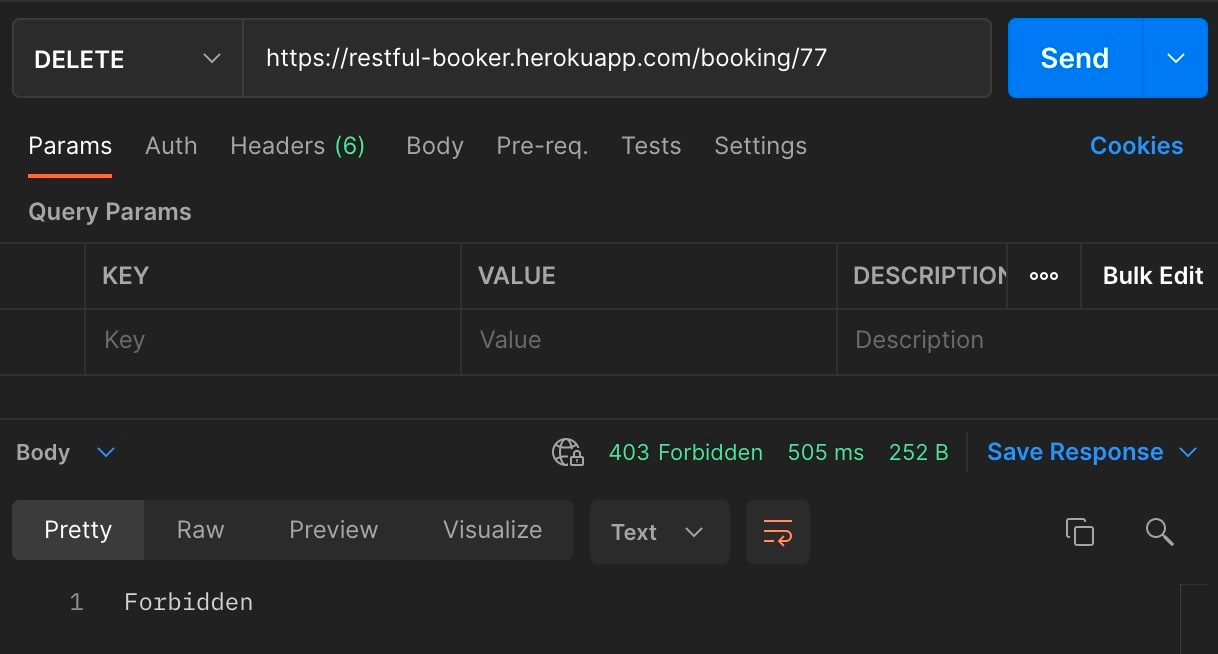
As we can see, the server returns a 403 status code, with the message Forbidden, not allowing the client to perform the request without identity confirmation. Now, let’s delete a booking with two different ways to authenticate:
- Authentication via request auth – Choose the basic auth type, fill out a valid username and password, and send the request:
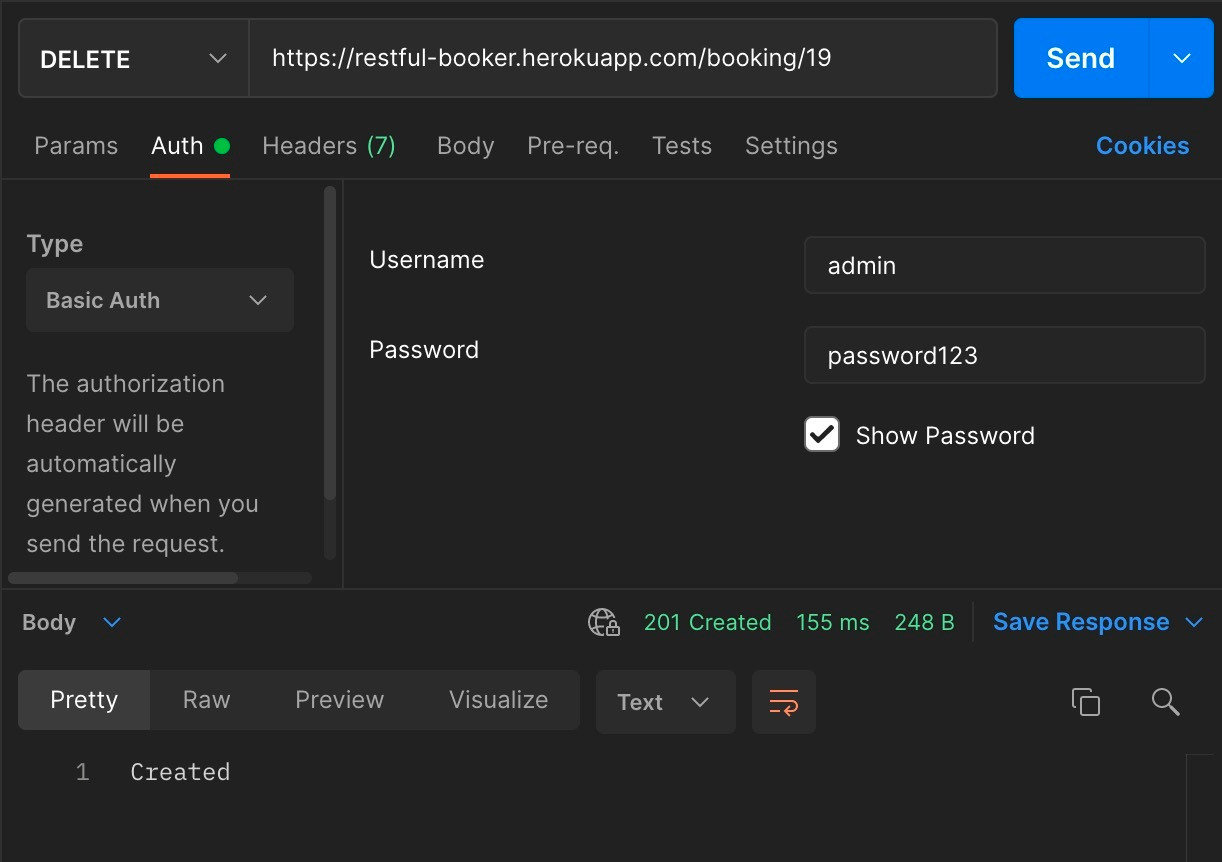
This time we confirmed our identity to the server, so we managed to delete a booking (don’t get confused by 201 Created response, it’s an API implementation thing).
- Authentication via token – the authentication token is sent as a Cookie. In the Headers list set the Cookie header to token=abc123 (don’t forget to turn off basic auth from the previous example):
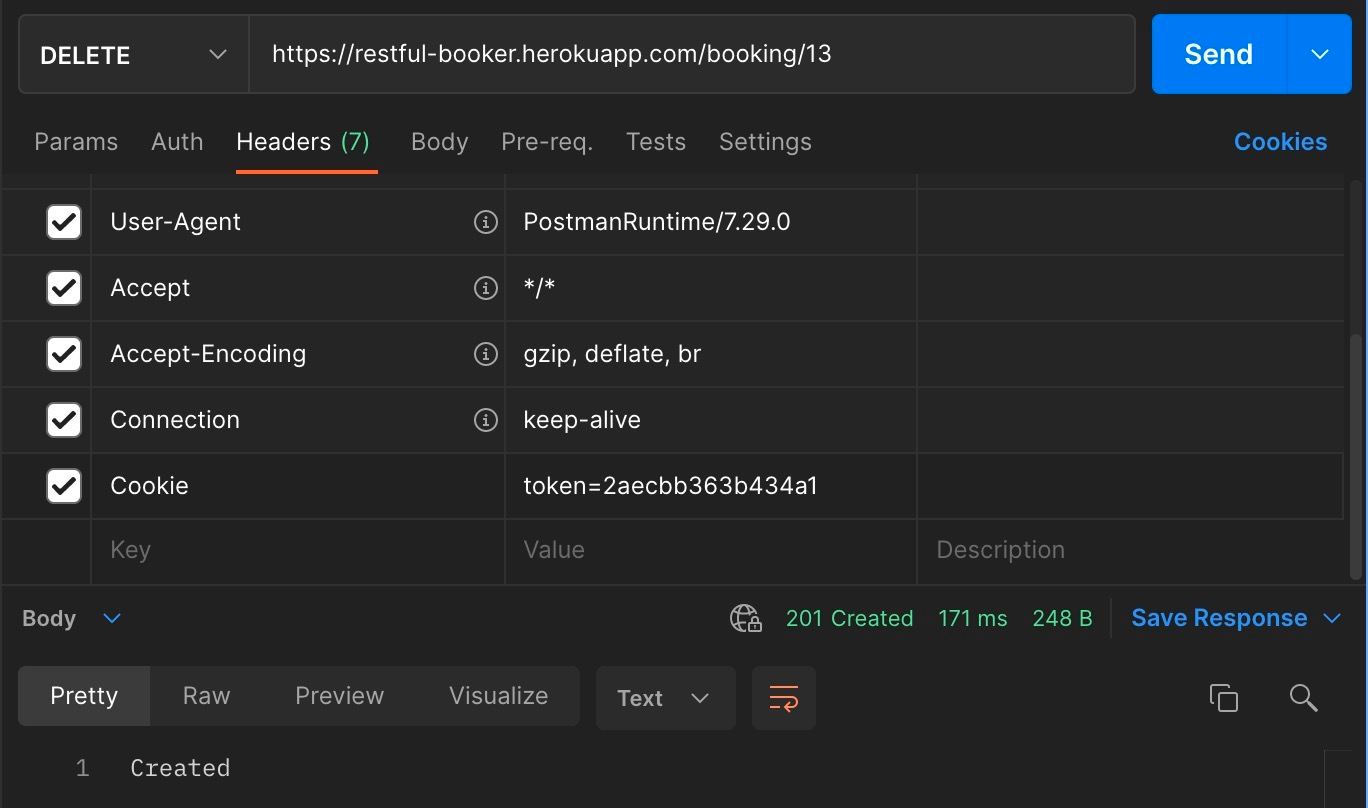
We’ve seen a few request variations, now let’s analyze the response of the last request:
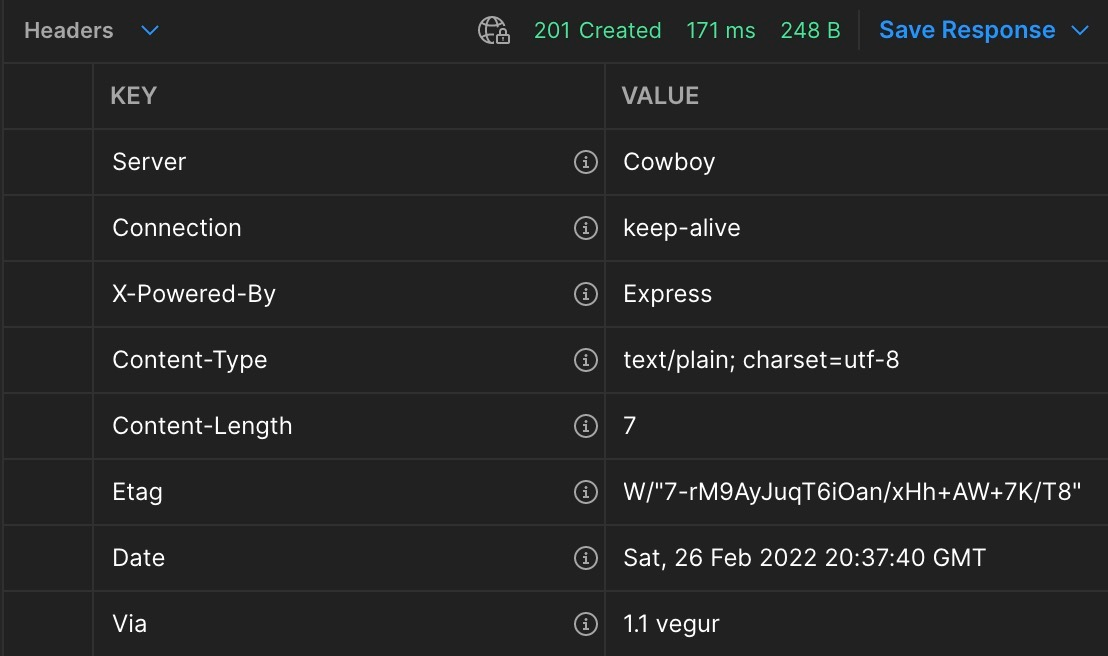
Besides the response body, the response contains a set of headers that describe the request, status code, execution time, and the response size.
Level up your API testing
In the last chapter, the basic usage of Postman through making API calls was discussed. In order to improve the efficiency of the API testing in Postman, let’s have a look at the few additional features that can be helpful:
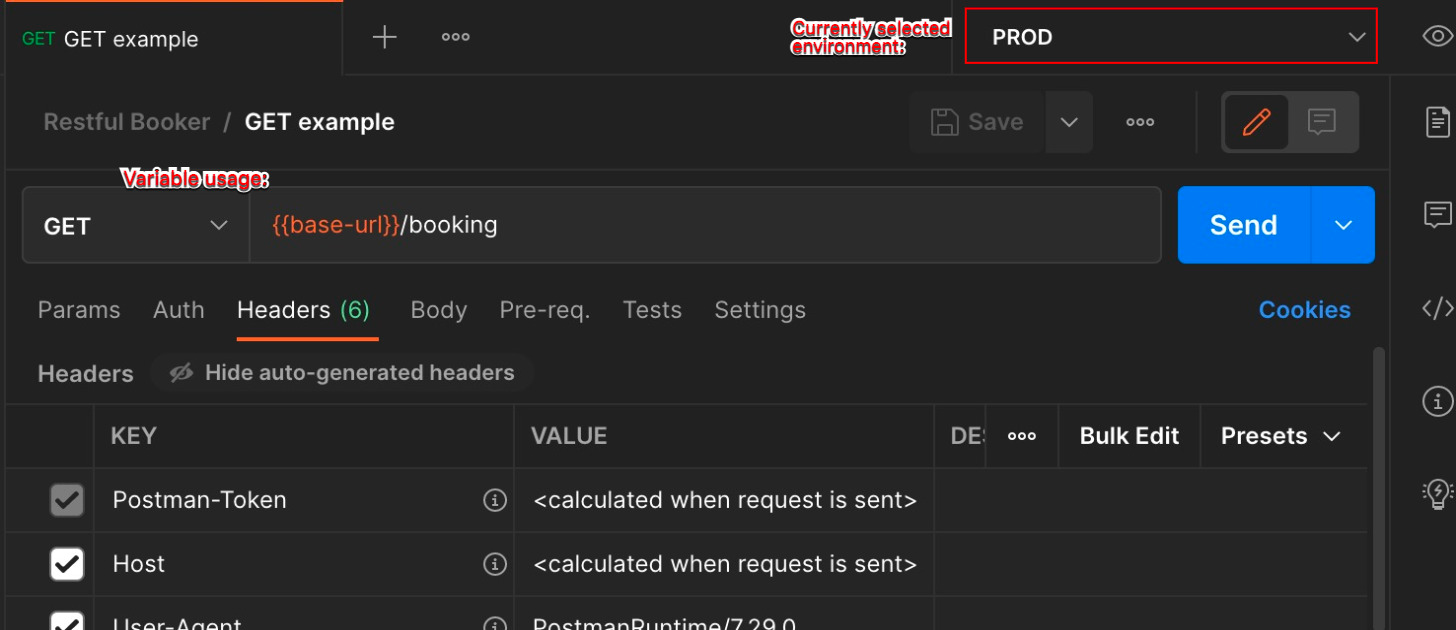
- environments and variables – environments are sets of variables related to that particular environment. Environments and variables, improves the control, organization and usability of variables within collections and workspaces. Development teams usually have Prod, Staging, Dev, Local and similar environments. Global variables can also be created in Postman, and they are globally available and environment independent. Variable scoping is a bit more complex topic and it’s out of scope of this article, but if you’re interesting in it, feel free to take a look at the variables section of the Postman documentation. Let’s see a small example of environments and variables in our example. First, lets open the Environments section from the left bar, and add a new environment called PROD. Now, let’s add a new variable called base-url with the value https://restful-booker.herokuapp.com. We can make use of this variable by switching our environment to PROD, and replacing base url from our requests with base-url in curly braces (Postman syntax for variable usage). Now our request should look like this:
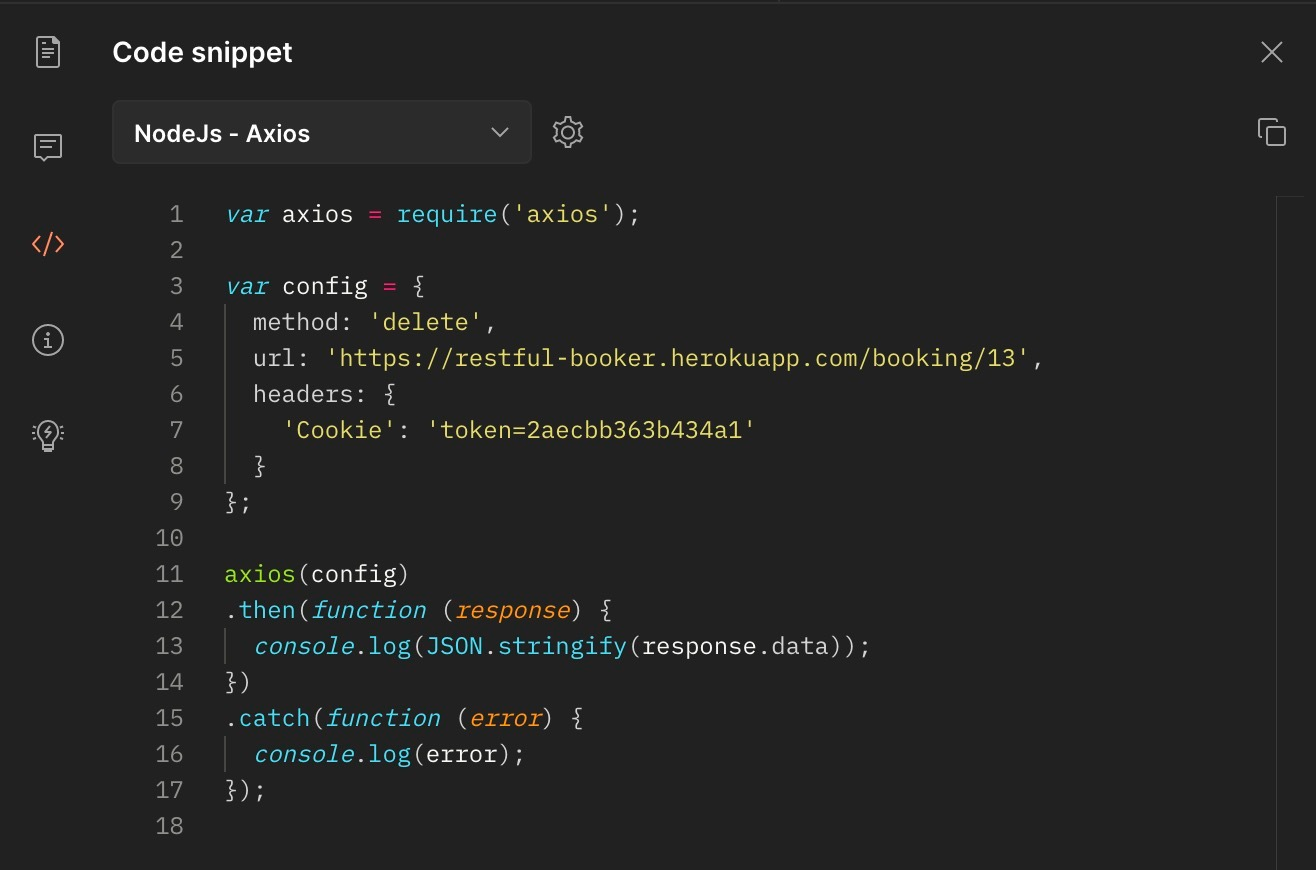
- code snippets – on the right bar, clicking on the Code icon will spawn a code snippets window. This functionality enables user to export currently selected request to a code snippet that will re-create the same request in a variety of different programming languages and frameworks:
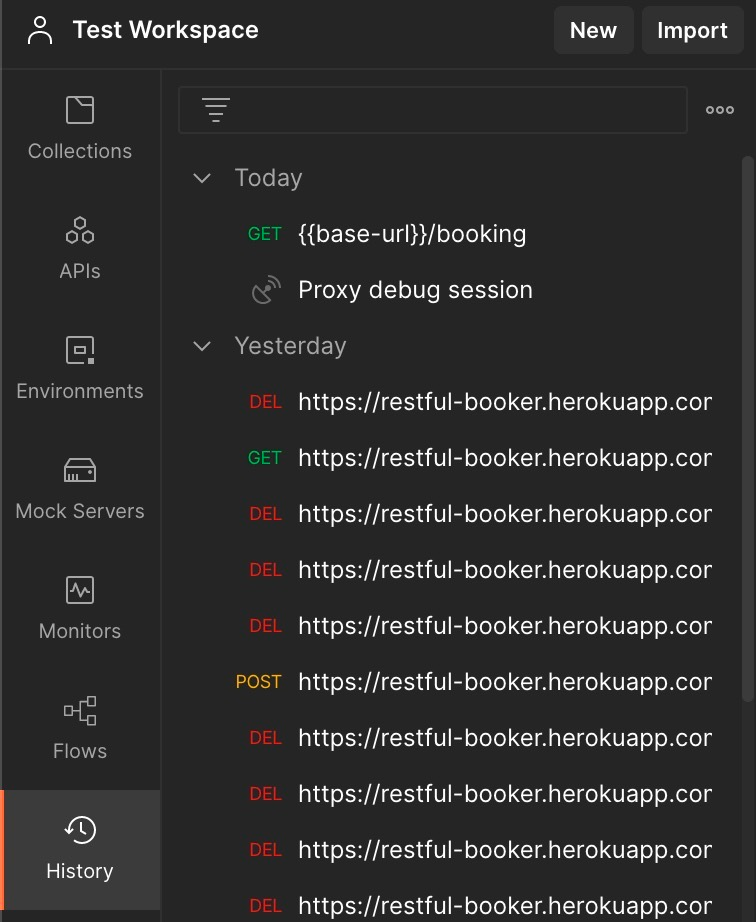
- history – history of requests made in Postman
- console log – from the bottom bar, users can access the console log which contains detailed request data, and it’s particularly useful for troubleshooting tests and scripts
Conclusion
In this article, we went through a Postman setup and configuration, a basic set of functionalities that enable us to send API requests. We also learned how to use the response data and some additional features that can make our work with APIs more convenient. In the next article, we are going to dive deeper into the API test automation with Postman.
Useful links
Postman:
https://www.postman.com/downloads/
https://learning.postman.com/docs/
Restful-Booker API: